

Streamline your Salesforce development by creating great wireframes
Do you want to streamline your Salesforce development? Wasting hours of time moving fields around page layouts? Then this post is for you. We’re going to look at the art of wireframing. A wireframe is a way used by UX/UI designers to lay out the content of a page, without developing it. It’s a simple idea, yet the results are incredibly effective.
Working in IBM and iX it’s something we use a lot in our projects outside of Salesforce, but is often forgotten about when working with Salesforce and leads to a lot of wasted time explaining to devs. or agreeing where things should be placed on a page layout for example. In this post we’re going to look at why wireframing is important and the benefits it can have to your implementations. We’ll also be covering Sketch which is the tool I personally use to create wireframes, but it comes down to preference.

We’ll be breaking this post down, exploring the advantages of wireframes, the disadvantages, and how you can use a tool like Sketch to connect with Salesforces Lightning Design System to create amazing wireframes. Shout out to my colleague and awesome Sketch teacher Max Rickards.
Advantages
The advantages definitely outweigh the disadvantages for wireframing. As I mentioned, how long have you spent conversing with colleagues or clients trying to decide if a field should be on the left or the right of a page layout? or you finally get round to developing a backlog item and the developer asks where it should appear? I can take a wild guess at hours. With that in mind, here are some advantages of wireframing:
You haven’t actually built anything - With wireframing, you haven’t actually invested any development time. You can agree up front with your clients how a page layout should appear, how components should appear on the page etc. This helps have it locked down before build, rather than wasting time during.
Easy to mockup and maintain - Depending on how you choose to create your wireframes, they’re relatively easy to mockup and maintain. They’re also easy to change!. You complete your wireframes and show them to your client, you can drag and drop components right in front of their eyes until everyone can agree vs an admin going to and throw.
They can be shared easy - There’s one issue with showing clients work completed in a sandbox, they need access somehow. That requires either you to be in a room with them or setting them up with a login, which again takes time. Wireframes can be shared with anyone at the click of a link. Simply export your wireframes and then share the link with whoever needs access.
Save questions - With a wireframe in front of you, displaying exactly how Salesforce would display, you avoid those easy questions such as where should this be on the layout? What should the user journey be? Should this field be required? this makes your life easier and your devs lives easier, everyone is happy all round! You can also attach your mockups to your user stories, so the developers always have reference when needed.
Some tools connect with SLDS - As you’ll see with Sketch it has an out of the box addon which allows you to install the Salesforce Lightning Design components for use within your wireframes. This means your wireframes will appear exactly as Salesforce would.. cool right? If you’re unfamiliar with what the SLDS is this link should help you a bit further.
Documentation - In previous posts i’ve mentioned documentation often gets missed. You can use your wireframes to document your pages also. Highlight why something is placed the way it is and add comments so that anyone potentially looking at your implementation in the future is knowledgeable as to why it was built that way.
Development made easier - If you’re designing lightning components for example, the implementation will involve using exactly the same SLDS components as you have used within your design. Simply link the devs to the component library and there is a whole host of tips on how to implement it into an actual working component.
It gives you something to come back to - Get sign off on your wireframes people (from both developers and clients).. that way, when it’s been built and someone says that isn’t the way it’s supposed to be, show them your signed off wireframes.
Estimating is easier - I will use wireframes to get estimates for my stories. During a sprint refinement wireframes hugely help developers being able to estimate and consultants being able to talk through the backlog item easier. Don’t underestimate their power.
Disadvantages
I know you’re thinking, wireframes sound too good to be true, there must be loads of disadvantages… but you’d be wrong. It’s not totally free sailing though. Here are some disadvantages i’ve come accross:
Requires time to up-skill - If you want to use a tool like Sketch then it requires some time to up-skill and understand how it works before being able to produce great wireframes. There are loads of great resources out there which help and from personal experience only took me about a week or two to get to grips with it. Once you’ve learned though, it becomes a lot easier.
You need to be organised - You can imagine if you have larger implementations, and you’re mocking up each screen you can end up with hundreds of wireframes. You need to be organised to ensure you don’t get lost in your own creativeness!. Sketch offers great way to organise pages/projects to ensure they’re easy to access and in turn makes it easy to maintain them.
Consultant/Developers are scared - Yes scared… because when you usually think wireframe and designers, you think what on earth are they going to come up with! They come up with some crazy ideas that you could never possible implement. But with the SLDS this doesn’t happen anymore so no need to be worried!
Sketch
Now lets look at the tools we have available to create these wireframes. I’m going to be using Sketch which a design tool mainly focused around UI/UX with over 1,000,000 users. The benefit of Sketch is as I mentioned, it has a plugin with the SLDS, whereas others don’t. The downside is that Sketch is costed at 99$ one off payment or 9$ per month for teams. If you work for a large organisation they may have already a commercial license in place so worth checking. For the price Sketch is definitely worth it if you’re serious about wireframing for your projects. You can also try it for free for 30 days to see how you get on here.
Once you’ve got Sketch there is a couple of things you need to do in order to create great wireframes. The first is install the SLDS components. You can do this here. The readme takes you through everything you need to install and how to set it up inside Sketch. You’ll also have to download some fonts to ensure it’s working correctly. Once you’ve done all of that you’ll notice if you go to the ‘+’ insert button in the top left, you’ll now have access to the SLDS library.

This allows you to simply drag and drop Salesforce components, as they would appear in any environment directly onto your page. Now remember back to our disadvantages, we need to be organised, and this needs to happen from the offset. So first we need to name our project, I usually name it on the process or designs that I am doing, Salesforce Page Layouts for example.

Once you’ve named your project, we start with an artboard by going to our ‘+’ Insert button and then ‘Artboard’. Then draw out on the page the size you want but 1200w x 1000h works well.

This is now our base for the wireframe, we’ll be adding components on top of this. We need to rename our component coming back to the ‘organised’ piece. We’re going to rename it ‘Contact Record Page Layout’ although this can be whatever it is you’re wireframing. You can do this by clicking ‘Artboard’ and then renaming.

We’re now ready to start adding some components!. Go to ‘+’ Insert again, then select SLDS Component Library > Desktop Components > Global Header. You’ll notice it then appears on your artboard, you can resize it to fit the page. Then do the same SLDS Component Library > Desktop Components > Global Navigation > Standard Navigation. Now you' should end up with something like this:

See how easy that was? we now have the top part of our page. It’ll take you a while to figure out which components to add where but it comes with practice and you can always view the components here if you’re stuck. We’re creating a Contact layout, so lets change the highlighted tab by clicking on the tabs and then looking at the bar which appears on the right. You can now change the names of the tabs and there state, easily. Click the state of the Contact tab and change it to ‘Selected’ like so:

This side panel on the right will allow you change all the configurable attributes for the component so make sure you’re using it. You’ll need to change the home tab back to ‘base’ from selected for it to appear like mine. Now lets add the highlight panel. Again ‘+’ Insert > SLDS Component Library > Desktop Components > Page Header > Record Home. Change the details using the right column to Contacts.
Now we want to add some fields. Go to ‘+’ Insert > Shape > Rectangle and draw a space for our fields wherever they’re to be placed on your page.

Now our page is coming along nicely, we need some fields and a section header. Go to ‘+’ Insert > SLDS Component Library > Desktop Components > Expandable Section > Section Title > Base then resize accordingly and double click on the text to rename. For the fields, go to ‘+’ Insert > SLDS Component Library > Desktop Components > Input > Input - Default. There are different types, for example picklists it’s another component, or input icon left for lookup fields. You can add as many fields as you wish, heres what I did with mine:
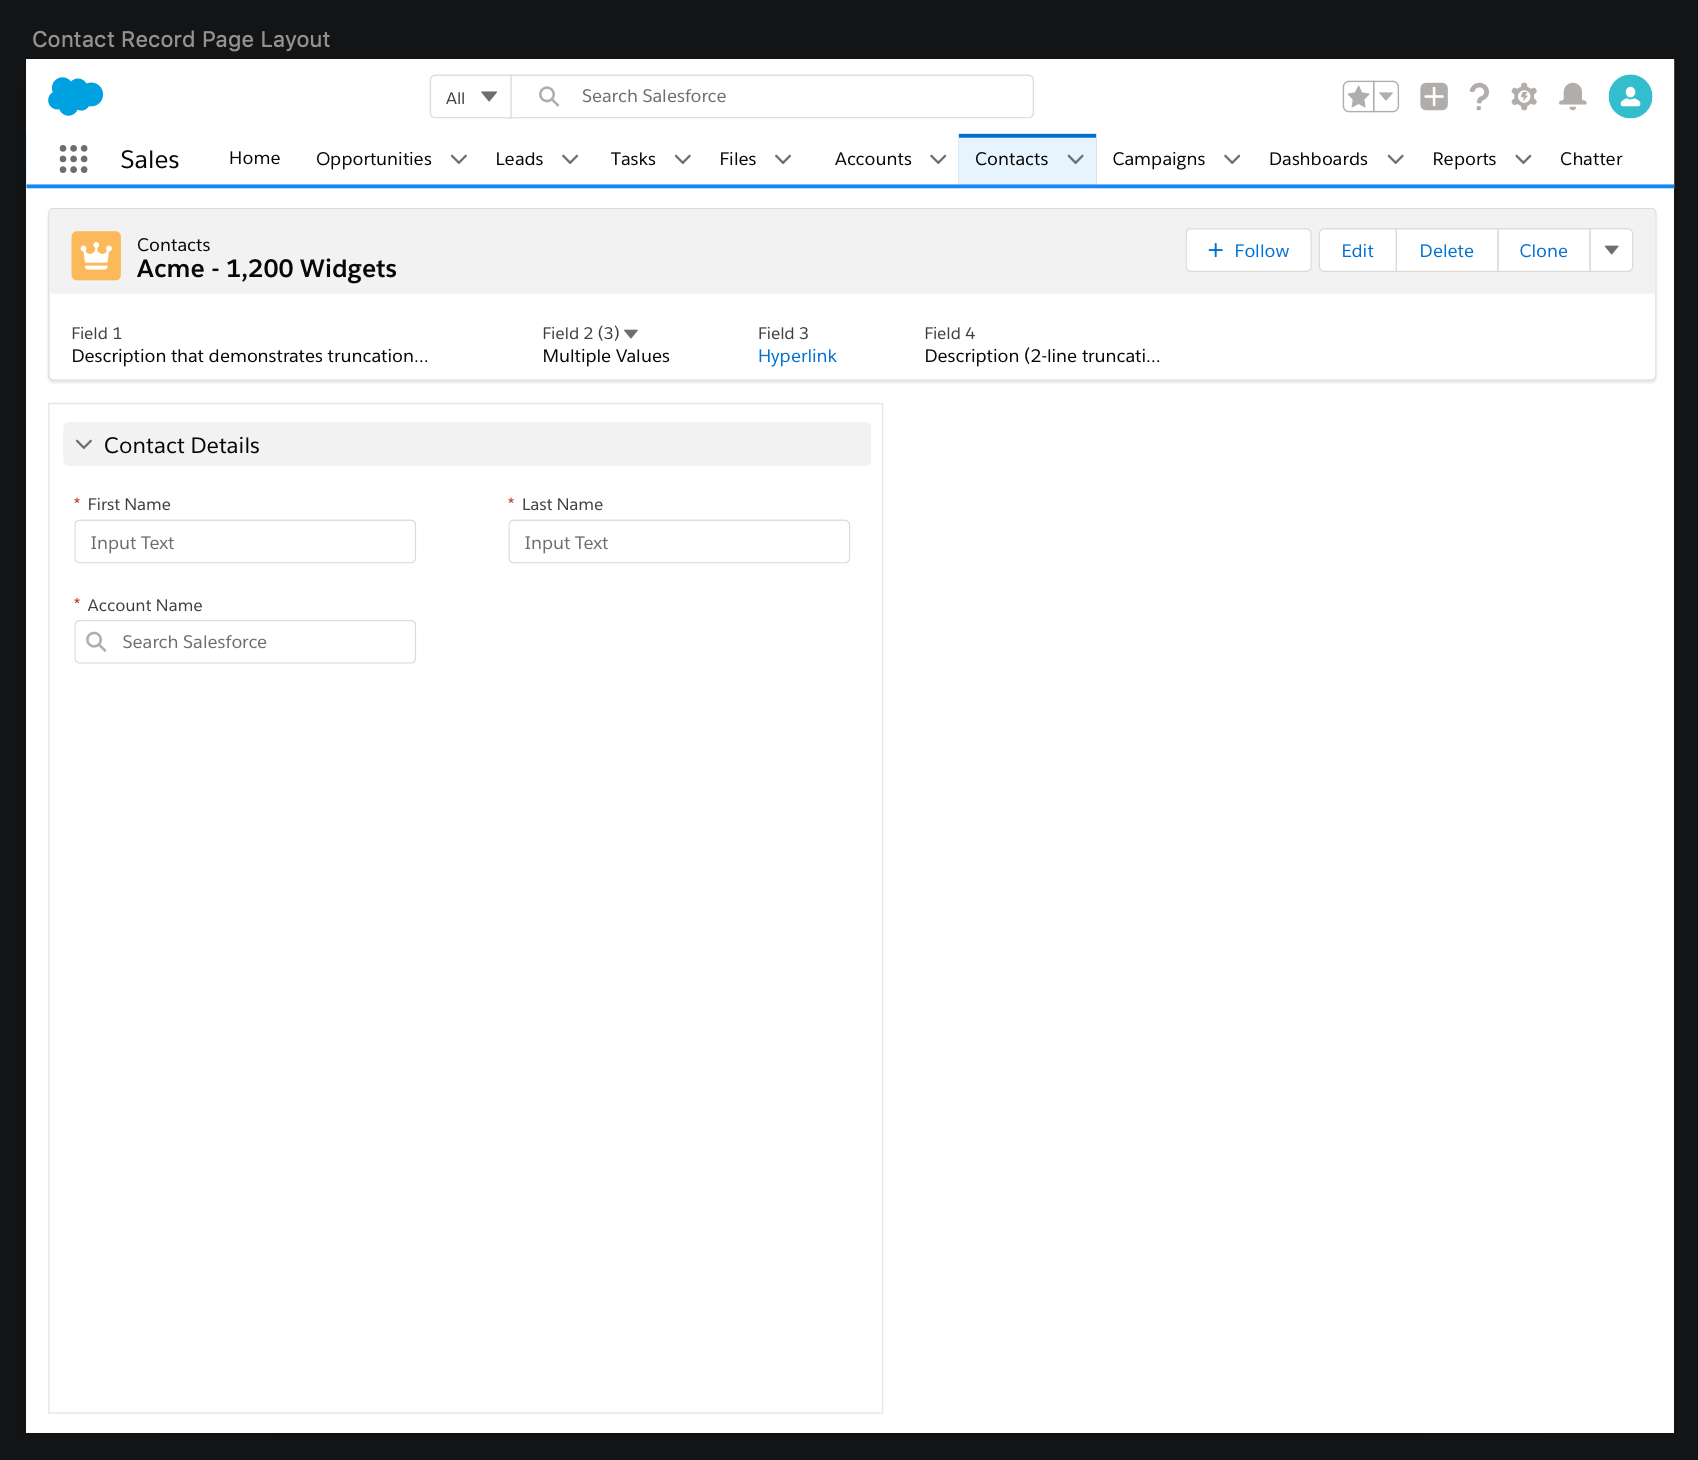
You can use the right hand panel to make fields required and also include help text icons. All useful when you’re creating wireframes for your developers. Continuing adding your fields and section headers, then experiment by adding in some other components to build out your page. Here’s what I ended up with:

I know you’re thinking this seems like a lot of effort, but in the long run once you learn the components and how the editing works it' gets much easier and you can take a wireframe from conception to real in little time. There are hundreds more things I could cover, but this should go over the basics and allow you to begin creating some wireframes using Sketch. I am going to create these posts in a series (and potentially start some video series) so we can also cover using symbols/how you can export designs to Zeplin and whole host of other great stuff so watch out for those.
Closing Out
Now you’re flying and creating wireframes for everything.. and i’ve only highlighted one use here, but you can also use Sketch to create flows, custom lightning components and anything you can imagine!. If you aren’t already creating wireframes I highly suggest doing so and I promise you will reap the benefits. I apologise this post turned out a lot longer than I thought it would, if you’ve made it this far I applaud you.
As always feel free to reach out to me on any socials if you have any questions regarding wireframes or Sketch, i’m happy to help.

